Garden Pergolas

If you are looking for inspiration in garden designs, you have come to the right place. Having comfortable furniture to relax, entertain, and dine on can make your outdoor home enjoyable and more importantly look gorgeous. Adding a feature to your garden or courtyard might include building a pergola. By definition a pergola is a structure or archway with a framework covered in climbing or trailing plants.

It consists of posts and beams but no walls or roof. Freestanding or attached to your home, a pergola is usually designed to be a shaded walkway or relaxation area. A gazebo, on the other hand, is a free standing structure with a peaked roof, an open framework and a proper roof.
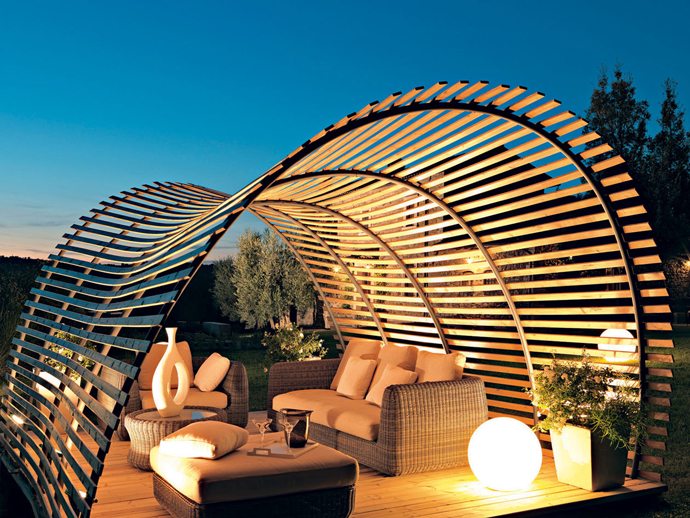
designrulz

Here are tips for building or choosing a garden pergola, and what to consider before you do.

· Any feature or point of interest in your garden should still blend with the style or your home. Take time to research your pergola design.

· Council approval and/or permits should be obtained before work begins.

· Ensure the building materials are suitable for outdoor use. Metal pergolas are now available.

· A pergola must be built to withstand the elements. For example, bolts and screws should be used instead of nails to ensure the long term strength and safety of the structure.

· Pergola kits are available, however, unless you are an experienced and capable handyman consider using the services of an experienced builder.

· Always ask to see a builders credential and try to view any examples of their work if possible.

Either way, designing your garden should be a fun, relaxing experience. Green labyrinths, cobblestone pathways, small ponds, water fountains, colorful flowers and small round trees flanking your way around the yard- these are all elements that can induce a wonderful state. After all, there is nothing like enjoying a fresh morning surrounded by your own green refuge, or taking some well deserved time off in the afternoon, after a long day’s work. – source
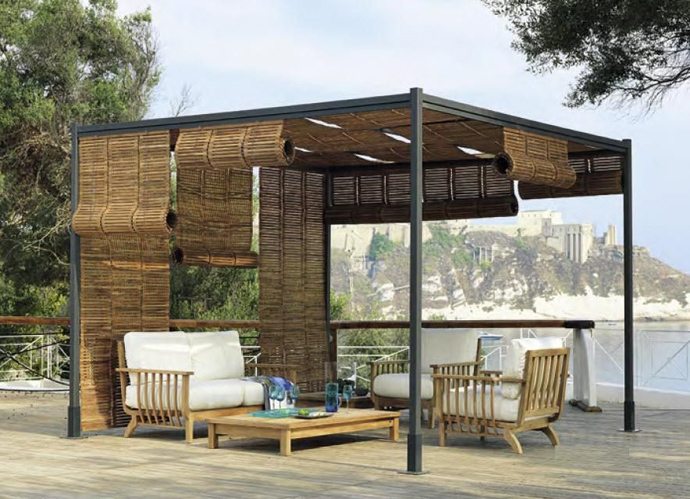
 

 alfresco

Want To Build Yours?

Here’s some tips on how to build your own pergola from the Diy Network.

Before building a pergola, it’s smart to plot everything out on paper first. If you’re building it on the ground, you’ll need to mark and dig holes for the corner posts at least 3 feet deep (even more if you live in a deep frost area). For extra support, you may want to frame and pour concrete footings for the posts to sit on. Make sure the posts are level and placed at correct intervals before filling the holes with quick-setting concrete.

Choose Materials and Tools

A hammer drill, some quick drying epoxy and anchoring bolts are the tools you’ll need. Several types of materials can be used to build your pergola. Pressure-treated pine will hold up against the elements, but also can be heavy and difficult to use. Cedar and redwood are natural woods that resist decay, are easy to work with and age to a pleasing gray color. Mahogany is a tight-grained hardwood that resists pests and rot. When treated with marine oil, it has the appearance of teak. You can also use composite materials, which hold up well and are virtually maintenance free.


Install Corner Posts and Support Beams

Secure metal braces to the stone or concrete surface for your corner posts. The next task is to cut four 2×8 support beams. Using a jigsaw, decorative features can be cut into the ends. When attached to the corner posts, the beams should be even and level. Use galvanized carriage bolts to secure the support beams to the corner posts. Countersink them on both ends so they will be flush with wood. Use #10 screws to secure the crossbeams to the support beams and the slats to the crossbeams.

walpolewoodworkers.com

Add Accessories

When finished, you can paint the wood, or stain and seal it with a waterproofing sealant. Since over-spraying can leave a residue on your house, it’s better to apply the stain with a roller or brush. To keep your wood deck from turning gray, you’ll need to purchase a sealer or stain with an ultraviolet (UV) protecting chemical. Add some plants and patio furniture and your garden pergola becomes a warm and cozy place to relax.

How To Build A Rock Garden

Rock gardens are a great way to display small plants – especially alpines – to great advantage. It is not difficult to get the conditions right and create an attractive garden style, using rocks or stones to set off these underused plants.

A rock garden can provide several different habitats in even quite a small area. Rocks can be placed so that sun-loving plants make the most of its sunny face whereas a shade-tolerant plant can nestle in the same rock’s north-facing shadow.

Alpines originate from high altitude regions above the ‘tree line’. There is good drainage and usually cold, dry winters, with high light levels. In gardening terms, however, ‘rock plants’ embraces not just alpines but also includes smaller shrubs and perennials that – because of their modest stature – look good in a rockery too. Gathering together plants with similar requirements and establishing them in a well-designed rock garden takes time and effort.

A large garden is not essential as it is possible to incorporate a rock garden into all sizes of plot. Specific features such as a dry stone wall and alpine sink or trough are particularly suitable for smaller gardens.


When to build a rock garden

Autumn and winter are good times to construct features when there is less to do in the garden. Spring is the optimum season to plant since an extensive range of plants are available at this time. Plants can then establish themselves for a growing season before the challenge and enemy of rock plants – winter wet – arrives.


How to build a rock garden

Choosing the site

Whether you are able to devote a corner of your garden to creating a rock garden or you are planning to transform the whole back garden, it is worth considering the details of the microclimate.

  • Aim to use the most open position, away from overhanging trees or tree roots, where plants will receive sun for the greater part of the day
  • It is better to have fewer hours of sun per day than the whole day in light shade
  • Choose a position where the drainage is perfect, unless you are prepared to build raised beds or enhance drainage in other ways
  • Avoid frost pockets if possible


Preparation

Sketch a plan of the proposed rock garden, bearing in mind the gradient, any underground pipework, the amount of shade and how you might best view it.


Materials

Rock gardens are quite an investment in hard materials such as rock, stone, and gravel or slate.

Choose local stone if possible. It will look in keeping with the surroundings and  it is easier to go and choose the most suitable pieces from the quarry or landscape merchant.

  • Buy salvaged or second-hand natural stone
  • Sandstone is an example of a suitable rock, widely available, that is not too alkaline (limestone) or hard and dense (granite).
  • Limestone from natural ‘limestone pavements’ was widely used.  These pavements are a scarce and finite resource with a unique flora.  They are now protected and quarrying prohibited
  • Choose stone in a range of sizes so as to construct a natural looking outcrop


Building the rock garden

Construction of your rockery may seem rather daunting. For larger projects you will need the help of a professional landscaper, but smaller projects are quite feasible.

  • Mark out the area using  marker spray from a builders’ merchant or with dry pale sand poured from a bottle.
  • Ensure that the area is weed-free, by hand weeding or using herbicide
  • Build a base 15cm (6in) deep of coarse rubble, broken bricks, stone, ballast or pea shingle
  • To prevent the base layer from mixing with the compost, spread a layer of inverted turves over this, if available
  • Alternatively, use a polythene sheet with holes punched at 10cm intervals, or permeable landscape fabric


Placing the stone

To create as natural a rock garden as possible;

  1. Select large stones to act as ‘keystones’. Position the larger of these first and place the remaining ones so that the strata look natural.
  2. Use a spade to dig out hollows to set the stone into.
  3. A crowbar will help move the stones into their permanent positions. Support them with smaller stones or bricks underneath.
  4. Aim for a naturalistic look when setting the rock in place. The rocks should tilt backwards, with the strata running the same way.
  5. Use weed-free top soil for the top layer of the rock garden, working it underneath and between the stones to set them firmly in place.  Soil-based potting media such as John Innes No1 with added grit (up to 30% by volume) are weed, pest and disease free
  6. Bury the stones up to a third of their depth, firming them in place.
  7. Leave the areas between the stones unfirmed and add the specially made compost over the area to create planting pockets.

The basic planting mix should be;

  • One part loam (ideally but sterilised loam, but in a pinch garden soil can be used)
  • One part horticultural grit
  • One part leafmould or coir

This can be adjusted for individual plants’ requirements.


Planting the rock garden

Water the plants and place them in position while still in their pots. Allow for the plants’ height and spread when fully grown.

Remove the plant from the pot, tease out the roots slightly and remove any weeds from the surface of the compost. Make sure the plants are planted firmly in the compost mix and are top-dressed with gravel or grit.


Crevice gardens

Crevice gardens have become popular in recent years. Sandstone slabs are set vertically into sand and infilled with more washed sharp sand or grit, or, better, John Innes No1 potting media to which up to 30 percent by volume of grit is added.

The advantages are that the plants have a deep vertical root system, keeping them cooler in summer and warmer in winter, compared to growing in a more traditional rock garden setting. Moisture is used more efficiently in the microclimates made by the rocks forming the crevices.

Article courtesy of rhs.org.uk

Urban Gardening

The urbanorganicgardener.com has put together a fantastic guide and infographic for those of you who want to grow an all year round urban garden.


The Joy of Growing Window Herbs Year-Round

Have you ever thought about growing your own indoor herbs? If you’re kitchen windowsill isn’t already crammed full of pots overflowing with leaves, then it should be!

The beauty of keeping a “windowsill herb garden” is that you can rely on a steady supply of leaves all through the year. When outdoor plants have died back or gone dormant over winter, your window herbs will keep happily ticking along.

The process of starting your own “kitchen herb garden” from seed is simple. The great thing is that many plants not normally found in garden centers are available to you. Scrumptious edibles like dark basil, chamomile, lovage and yarrow (to name a few) are all options. What about the magical, medieval plant mugwort? Or that favourite for making lozenges, horehound?

Old favourites like thyme and rosemary will also fare wonderfully indoors as long as they’re properly looked after. Energetic perennials like chives will continue to grow even when light levels dip in winter. So you can lightly harvest even through the darkest months.

All you need are some pots, a good potting mix and some plant feed. If you’re starting your seeds indoors, where there’s no risk of critters eating the young seedlings, you can sow directly into the pots.

Let several seeds germinate and keep the best after they’ve put on some growth, snipping off the others with a pair of scissors. During late spring, summer and early autumn, your plants will be grateful for a bi-monthly or monthly liquid feed. Use a balanced NPK fertilizer (nitrogen-phosphorous-potassium) and a micronutrient feed like liquid seaweed. Many of the problems with herbs are due to trace element deficiencies.

And that’s it! The infographic included below is a visual guide to the process. Remember not to overcomplicate things and don’t be afraid of killing the odd plant…they don’t mind too much.


Indoor Herb Gardening


Growing Tomatoes In The City

You don’t have to live in the country to grow tomatoes. Here’s some tips from Garden Club on how to grow some in city landscapes.


The Tomato

Tomatoes are one of the most beloved garden plants in the United States and with good reason. According to the USDA Farm Service Agency, Americans consume an average of 22 pounds of tomatoes every year! Growing tomatoes at home does not have to be limited to the suburbs, even if all you have is a small patio or balcony. If you have a sunny outdoor spot, you can grow tomatoes in containers almost anywhere.


For successful container-grown tomatoes, it is wise to begin with a plant that produces tomatoes on the small to medium side. While it is possible to grow beefsteak tomatoes in containers, you will have far better luck with a cherry like Super Sweet 100 or a medium-sized variety like Rutgers. That doesn’t mean it is impossible to grow large tomatoes in containers, it is just more of a challenge.

Varieties that have patio in the name have been specifically bred to perform well in containers, and some of them are quite good.

  • Burpee Patio Princess Tomato Seed
  • Bonnie Plants Organic Patio Tomato Assortment
  • Ferry-Morse Heirloom Tomato Rutgers Seed


The Container

To ensure success growing tomatoes in containers, choosing the right container is as important as the tomato plant itself. As a general rule, you want your container to be as big as possible. Tomatoes need a deep, strong root system to thrive, and a large container will give your tomatoes plenty of room to grow.

Your container need not be expensive or ornate. Most tomato plants in containers will require some form of support as they mature. There are fans of both staking and caging and it is true that each have their own merits. Whichever form of support you choose, it is best to put it in place when you plant the tomato seedling in the container. This lessens the possibility that you might damage the root system later by pushing a stake or cage support into the dirt.

One advantage that staking may have over tomato cages for containers is that it is easier to drive a stake deeper into the container, and because the soil in a container is looser, a cage may not be as stable as it should be.


The Location

The most important thing to look for when choosing a location for your tomato plants in containers is sunlight. Tomatoes are sun-loving plants and they aren’t going to be happy with anything less than 6-8 hours of good sunlight every day. If you have a balcony or patio that only gets sun for part of the day, you should position your plants so that they get the most sun possible.